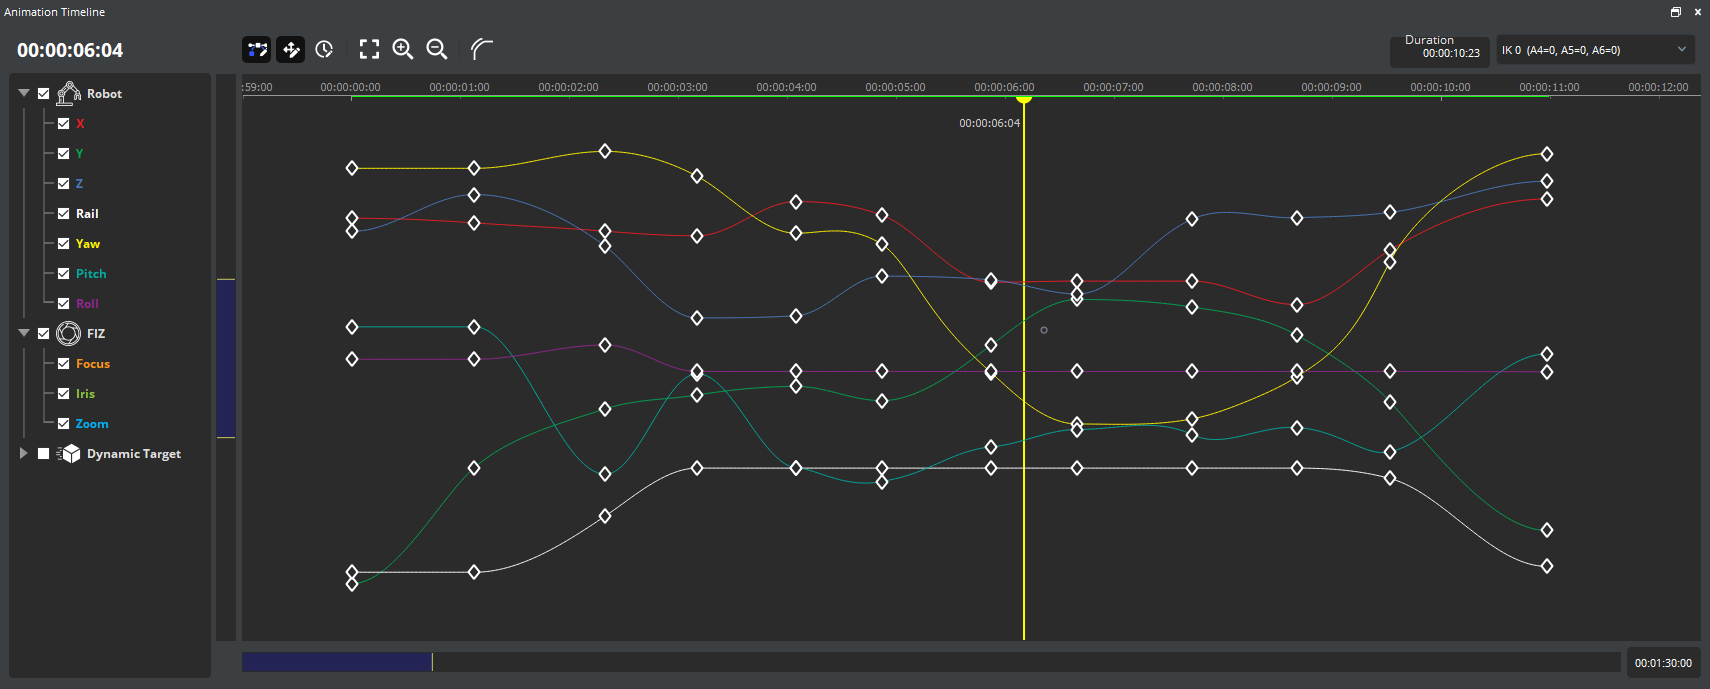
Our graphical timeline interface enables you to quickly design and fine-tune camera movements. You can edit, re-order, copy and paste keyframes, draw precise curves and adjust the timing of keyframes — all while preventing robot overload! You can also set up triggers to run actions in sync with your animations.
Adding Keyframes
Click the S-key on the keyboard to add a general (Robot + FIZ) keyframe at the current cursor position. By default, the S-key will keyframe the active animations which are checked in the tree to the right of the timeline. If the timeline cursor is above a curve, the keyframe is added based on the interpolated curve values, otherwise, it is added based on the current hardware (Robot/FIZ) position.
You can also use the R-Key to add a Robot Keyframe only. Note that the R-Key will add a keyframe based on the actual (solid) robot pose.
Similarly, you can use the F-Key to add a FIZ Keyframe only based on the actual FIZ position.
Adjusting a Keyframe
To move a keyframe vertically first make sure position editing mode ![]() is checked in the timeline toolbar. You can now drag the keyframe up and down on the timeline to adjust the axis value at this keyframe.
is checked in the timeline toolbar. You can now drag the keyframe up and down on the timeline to adjust the axis value at this keyframe.
To move a keyframe horizontally, activate time-editing ![]() mode in the timeline toolbar. You can now drag your keyframe horizontally to adjust its timestamp. Note that the keyframes for all axes in the animation move together along the time axis.
mode in the timeline toolbar. You can now drag your keyframe horizontally to adjust its timestamp. Note that the keyframes for all axes in the animation move together along the time axis.
Selecting Keyframes
To select a keyframe simply click on it on the timeline. This will highlight all the diamonds associated with animation axes controlled by that keyframe.
You can also select multiple keyframes by holding the CTRL key on the keyboard and dragging while holding the left button of your mouse to draw a bounding box around them. A keyframe will be selected if any of its axis diamonds are inside the bounding box when the mouse button is released.
If multiple keyframes are selected, adjusting any selected keyframe position/timestamp will also adjust that of the other selected keyframes by the same amount.
Copying & Pasting Keyframes
Once a keyframe(s) is selected, it can be copied using CTRL+ C and pasted anywhere on the timeline at the cursor position using CTRL+ V.
When pasting the keyframe(s), make sure that no keyframes are selected on the timeline including the keyframe that you are copying as this will cause this/those keyframes to be updated with the axis position values of the selected keyframe(s).
Adding a Fillet at a Keyframe
Controlling the Velocity and Ease-In / Ease-Out at Keyframes
To create a continuous path where an axis smoothly transitions between keyframes without coming to a stop, you can adjust the slope handle to control the axis velocity on the keyframe. The greater the slope, the greater the axis velocity. No slope means the axis velocity is zero at the keyframe.
To adjust the ease-in and ease-out, elongate the tangent handles of the keyframe. Changing ease-in / ease-out controls the axis acceleration and can often be used to create more dynamic and lively movements.
By default, keyframes are set to use Auto-Slope. When enabled, this feature automatically calculates the optimal slope and ease-in/out at keyframes to ensure the optimal flow of the move. You can notice how the slope handle dynamically adjusts as you drag a keyframe on the timeline.
Adjusting Keyframe Properties
You can click on keyframes to bring up their properties menu. Properties varievary based on the type of keyframe (Robot, FIZ, Target, etc.) and generally include the keyframe timestamp and the position and velocity of all of its axes. You can also optionally enable showing the Ease-in/out time in this menu through the General Preferences.
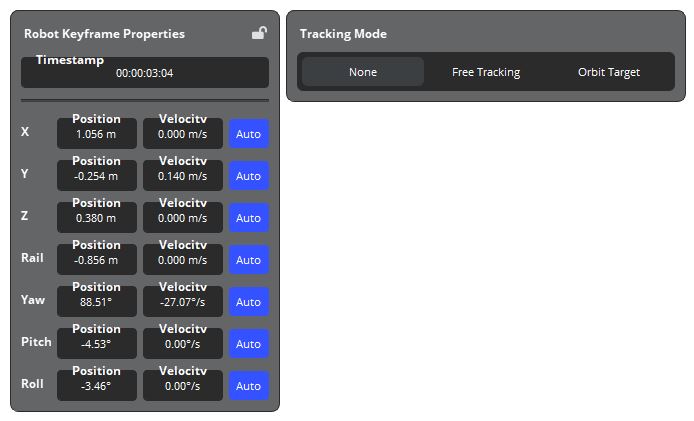
The Auto button can be used to toggle Auto-Slope mode for a given axis. In this mode, the keyframe slope (i.e. velocity) is automatically computed to provide continuous motion. Note that when a keyframe is set to auto mode, its slope handles will appear in light grey color on the timeline.
Some Keyframes also support trackers which are used to lock some of the keyframe axes onto a Target.
Finally, the padlock icon in the top-right of the Keyframe Properties Menu allows you to lock/unlock a keyframe. Locking a keyframe stops the keyframe from being edited to avoid accidentally modifying your move.
Setting the Starting Inverse Kinematic Solution of the Robot
To change the starting inverse kinematic solution of the robot, use the drop-down menu in the top right corner of the timeline to pick 1 of 5 possible motor configurations. Flip between the various IK solutions to vary the starting joint positions in order to extend the range of motion of robot axes 4 and 6 while staying within the mechanical limits of the robot.
Note that if you change the IK solution the robot will most probably need to perform a Flip of axes 4, 5, and 6 while getting ready.
Interpreting the Timeline Violation Indicator
The animation validation indicator is the colored bar at the top of your timeline. This bar indicates whether an animation is safe to run on the robot. In case of a violation, the color indicates the violation type. You can also hover over the violation indicator to get a tooltip with more info about the violation. The below table shows a quick summary of the various violation types and their colors.
Color
Violation Type
Troubleshooting Tips
Yellow
Orange
Dark Orange
Green
Red
Scaling an Animation on the Timeline
Right-click and select Scale Move to Duration or Scale Move. Use Scale Move to scale the animation by a given factor or Scale Move to Duration to scale the move to a given duration.
Note if 2 or more keyframes are selected on the timeline, the scaling will apply to the selected keyframe range instead of the full animation.
Flipping Keyframe order
Right-click and select Flip Order to invert the order for your keyframes. Note that this feature can be used to play a move in reverse by flipping the order of the timeline.
If 2 or more keyframes are selected on the timeline, the only order of the selected keyframes will be inverted.
Controlling what Animation and Axes are visible on the timeline
The Tree at the right of the timeline allows you to toggle the visibility of Animations and Axes on the timeline.
Click on an Animation or Axis to toggle its visibility. Note that toggling the visibility of an Animation will show/hide all of that Animation’s Axes on the timeline.
You can also Shift-Click an Animation or Axis to solo it. This will hide all other Animations/Axes on the timeline and only display the soloed axis.
Adding Triggers to the Timeline
To add a trigger action at the current cursor position, right-click and hit Add Trigger. A vertical white line will appear at the current cursor position to indicate where the trigger is added in the timeline. Triggers can be dragged horizontally on the timeline to adjust their timestamp.
Clicking on a trigger will bring out its Properties Menu which allows you to add actions to this trigger.
For more info on triggers check out the Trigger Section.